Work Coordinate Systems
Most production shops will rarely utilize a one-vise or one-fixture setup on a VMC or HMC when running a multiple piece production run. The most efficient production will have the cutting tool performing it’s function on as many parts as possible while it is in the spindle. That normally means adding as many multiple vises or fixtures as the room on the table will permit.
We will be devoting the next couple of posts to set-up and programming tips and tricks dealing with multi-part machining.
What does that multi-part machining mean for programming? As with anything in life … first we want to reduce the amount of work … in this case, the amount of programming. The use of sub-programming to cut down on the amount of typing or data entry or whatever work … is one. ( We dealt with sub programming in a previous post here : http://kipware.blogspot.com/2013/02/the-hows-and-whys-of-sub-programming.html ). The other is a little feature on most machines called WORK OFFSETS. In our post here we will be explaining the Fanuc style and codes of Work Offsets … since about 95% of machines out there are what we refer to as “fanuc compatible.” And that includes the popular Haas machines as well.
Why Work Offsets?
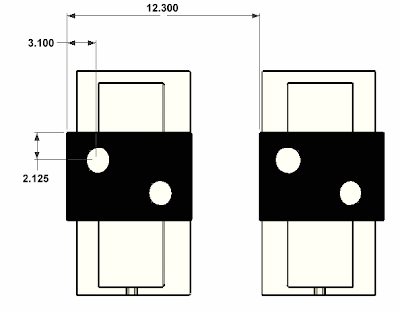
Let’s take a simpler example of placing two vises on the VMC table … both will hold identical pieces of stock … and we want to machine two identical workpieces using the same identical tools.
Hole dimensions are identical for both workpieces.
We could always do something like use the top left corner on the part on the left as X0/Y0 and then add the 12.300 + 3.100 to program the two holes on the part on the right … sure, simple in this case. But even this scenario is fraught with potential problems.
- What if we “bump” the vise … and the 12.300 is no longer the case. We now have to go back into the program and adjust the X and Y coordinates to reflect the new distance.
- What if one vice is a different height / thickness than the other … the parts Z0 is different.
- Next time we run the job … we have to get the vises exactly 12.300 apart … or alter the program again.
- …. it goes on and on … none of the scenarios are nice to imagine.
This type of situation … and this is a simple one … begs for the use of Work Offsets.
What are Work Offsets?
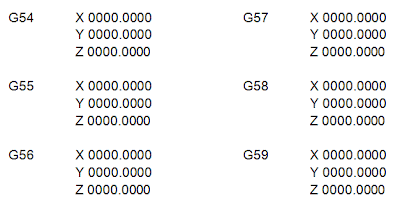
The Work Offsets allow the user to designate distances from the fixed Zero Return position on the machine to a certain location on the machine through an offset table. The Work Offsets are recorded distances from a fixed position on the machine … usually the Zero Return or Reference Return position on the machine. This position is the only position that can be repeated on the machine without fail … because it is defined from a physical limit switch. Once the electronics on the machine are powered off … most internally recorded positions are lost … no power to keep the computer running, it loses it’s memory. When the machine is powered back on … we can find our Zero Return by utilizing that function on the machines panel because it searches for that physical limit switch … it doesn’t rely on any memorized position … it is dependent on the physical limit switch. For that reason … all Work Offset positions are recorded from that Zero Return position for all axis.
If you were to look in the Work Offset table … you would see something similar to :
So the user measures the distance from the fixed Zero Return position to … let’s use our example … to the top left corner of the left hand vice as that parts X0/Y0 location. The measured distance is then entered in the Work Offset table … both X and Y … under one of the Work Offset designations … we’ll use G54. The steps are repeated for the left hand vice … and the X and Y distances are entered in the G55 offset locations.
In our example, let’s imagine that the vises and the stock are the same height in the Z axis … just for simplicity … but the Z axis could have a value similar to X and Y if required.
How to use Work Offsets in the G Code Program?
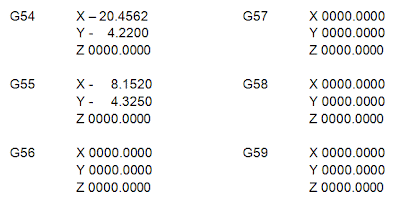
Let’s say we have the scenario below …. the machines Zero Return position is the point on the top right designated with the purple circle :
Our Work Offset Table would look like :
Now for the programming part. Whenever the G code calls out a Work Coordinate System …. G54 thru G59 … that Work Coordinate System becomes the default and any X / Y / Z coordinates called out for in the G code will reflect the X/Y/Z coordinates from the offset table. So the programming line …
G00 G90 G54 X0 Y0
… would move the tool to the top left corner of the left hand vise. If we were to then command …
X3.100 Y-2.125
…. we would position to the top left hole of the left hand vise … because the G54 Work Coordinate System is the default. Similarly … the command lines :
G00 G90 G55 X0 Y0
X3.100 Y-2.125
… would position the tool to first the top left corner of the right hand vise … then the top left hole of the right hand vise using the G55 Work Coordinate System.
So using the Work Coordinate Offsets and Work Coordinate System calls … it is very easy to switch between the left hand and right hand vise by simply commanding G54 or G55.
The Advantages of Work Offsets
As we outlined above … we are asking for problems when we don’t use the Work Offsets. How did we fix them?
- If we “bump” the vise … only the values in the Work Offset table will change … the G code program will not need any editing.
- If the vises were different heights …. we could easily use the Z value in the Offset Table to make that adjustment … again, no program editing.
- Next time we run the job … we only need to adjust the G54 and G55 Offset Table values … no program editing is required.
- and on and on and on. I’m sure you will see many more advantages on the shop floor.
As we progress through our Multi-Part Machining Series over the next posts … we’ll try to highlight some of the other programming Tips and Tricks that can be employed.
Stay Tuned …. and Happy Chip Making !!
Conversational CAD/CAM
Quoting & Estimating
G Code Conversion
CNC Training
…. and MORE !!!


