Milling a counterbore or doing other circle cutting using an end mill or similar tool can be a powerful and creative machining process. Most times replacing the need for a reamer, boring bar or other sizing tool. This type of cutting, when combined with cutter compensation gives the operator much more flexibility in adjusting the size of the finished hole.
However, the main drawback is usually created using simple programs and is usually found at the entry and exit points where a small tool mark can be created due to the tool pressure caused at the entry of the cut. With a little creative programming technique and some simple calculations, a much more efficient and “professional” program can be created.
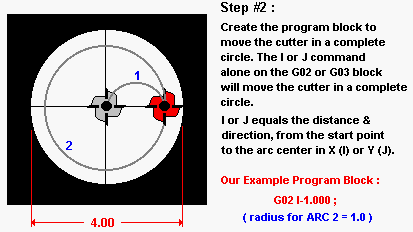
In this post, we’re going to take you step by step through a program creation to mill a circle using the “loop in – loop out” method which takes the cutter from the center into the side of the hole using an arc move – then cuts completely around the hole – then loops back to the center using another arc move. This type of cutting gives a real nice finish in the hole, helps maintain size a little better and leaves no tool mark at entry or exit points.
In our example, finish milling an inside round pocket using G02 or G03, a cutter mark will remain from tool pressure at the entrance and exit point of the arc. In order to create a smooth entrance and exit, some “tricky” machining technique must be employed because most machines do not have a “canned cycle” for the type of cutting explained here. Although this employs nothing more than simple G02 or G03 commands, the manner in which the codes are used and the type of process that results, makes efficient use of the simple codes and makes a more attractive and accurate workpiece.
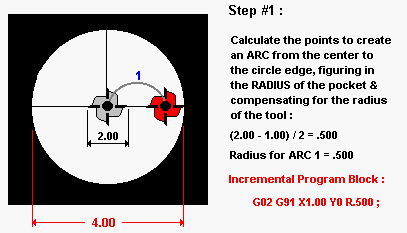
The objective with the example below is to create a smooth transition into and out of the cut. In the example below, we are attempting to machine a 2 in. radius circle with a 1 in. radius cutter.
STEP #1 : We calculate the arc needed to move the cutter from the center of the pocket to the finish wall edge. In the example below, we use the following formula :
2.00 (pocket radius) – 1.00 (cutter radius) = 1.00
This is the distance needed to move from the pocket center to the wall edge, allowing for the cutter radius.
STEP #2 : Next divide the total distance in half to obtain the radius needed to swing an arc from the center to the outer edge as calculated above.
1.00 / 2 = .500
If you like this concept … we invite you to take a look at our Kipware® Conversational CNC Programming Software …it auto-creates G code from fill-in-the-blank forms … NO CAD experience required !!! CLICK HERE for MORE
Cutter Compensation Note :
Some controls will allow for the activation of CUTTER COMPENSATION on the example program block #1. In that case, you can calculate the same as above but do not compensate for the cutter radius, instead call the cutter compensation G Code and compensation offset number on the program block. In our example, the program block would be :
G02 G91 G42 X2.00 Y0 R.500 D12
In this block, we are using G42 (cutter compensation right) and storing the radius of the cutter in offset #12. Using cutter comp as above will allow for the easy adjustment of the pocket size by adjusting the value in offset #12. Don’t forget to cancel the cutter comp with G40 after the tools cutting is complete.
Using a simple combination of sub-programming, you can take the example above a step further and create a simple Z axis step-down cycle resulting in the roughing of the above example with little effort.
In the program example below, we are taking the circle cutting routine created above and storing it in a sub program. The main program will step the Z axis down – call the sub-program to machine the hole at that depth, then return to the main program which will in turn move the Z axis to another depth and start the process again. This “cycle” repeats until the total depth is achieved.
Main Program :
{ start and position the tool to the hole center as normal }
G01 G90 Z-.100 F15.0 ; — move to the depth of the first cut
M98 P1111 —————- call Sub Program O1111 which does the cutting as above
G01 G90 Z-.200 F15.0 ; — move to the next depth of cut
M98 P1111 —————- call Sub Program O1111 again at the new depth
G01 G90 Z-.300 F15.0 ; — move to the next depth of cut
M98 P1111 —————- call Sub Program O1111 again
G01 G90 Z-.400 F15.0 ; — move to the next depth of cut
…. etc. till the desired depth is realized
Sub Program :
O1111;
G02 G91 X1.00 Y0 R.500 F10.0 ; — circle to the hole edge
G02 I-1.00 ; ——————— cut the complete circle
G02 X-1.00 Y0 R.500 ; ———— circle back to the center
M99 ; —————————- return to the main program
This is just one example of the combination use of the sub-programming feature and “simple” programming codes to create a user cycle. You can always use your initiative and create some other ideas. Maybe think about these :
How can you put the Z axis move in the sub-program as well ?
Call the sub program and repeat a set number of times ?
… any others ?
Kenney Skonieczny – President
Kentech Inc.


