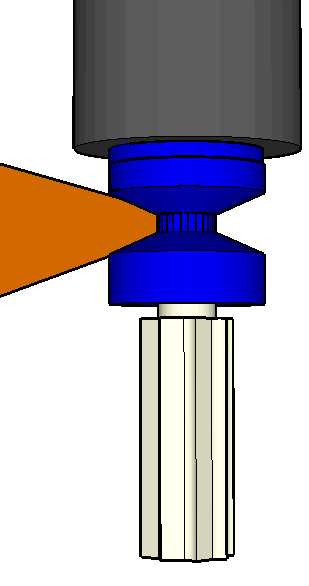
One of the most common types of ATC ( automatic tool change ) issues is mis-alignment between the ATC tool change arc or mechanism and the toolholder when it is in position, clamped in the spindle. Their are many symptoms and results from this mis-alignment … some of the most common can be :
- Toolchanger dropping tools during the tool change process.
- Loud noises and “bangs” when the tool holder is un-clamping or clamping during the tool change process.
- ATC arm or mechanism jamming in the tool holder under the spindle.
In this Making Chips post … we wanted to share a quick, down-and-dirty method of checking the alignment of your tool change arm or mechanism with the tool holder when in position and clamped in the spindle. This check is pretty accurate and can be done using only a machinist 6″ scale … and will give you a good indication if the ATC problems you may be experiencing might be related to ATC mis-alignment.
Step #1 :
Place one of your tool holders in the spindle and clamp it as normal. Using your 6″ scale … measure from the face of the spindle to the center of the V in the toolholder. +/- 1/64 of an inch is usually a good tolerance to use when measuring.
Step #2 :
Next … remove any tool holders from the spindle … leaving the spindle with no tool mounted. Step through your ATC process until the ATC arm or carousel comes into position under the spindle. Here you are mimicking the ATC process … step by step … and are pausing the process as if the ATC mechanism is under the spindle as it would be to change the tool. Again using your 6″ scale … measure from the face of the spindle to the male part of the V that would fit into the tool holder. Again … +/- 1/64 of an inch is a good tolerance.
If the dimensions from Step #1 and Step #2 are off by more than 1/64″ … ATC mis-alignment may be the cause of any problems you may be experiencing with your ATC mechanism.
The Fix :
In a Fanuc controlled machine … the Z axis stops at the “tool change position” through the use of the Zero Return or Home position … G28 command line. Although a hard limit switch is activated during the zero return process … the real process works like this.
- The axis rapids until it hits the limit switch.
- At which point the axis movement speed is reduced … and the axis continues to feed until the axis feeds off the limit switch.
- After the limit switch is switched off … a certain additional amount of movement is executed … this additional movement amount is knows as the “grid shift”.
This Grid Shift amount can be adjusted through a control PARAMETER setting to make the dimension obtained in Step #1 match the dimension required in Step #2. Fairly easy to do … but depending on the machine tool and Fanuc control model with which it is equipped … depends on which parameter # is involved. Probably better left to an experienced technician … although a gander at your Fanuc parameter list or manual can yield the correct GRID SHIFT parameter that can be adjusted.
Performing this simple check can give you a better idea if ATC mis-alignment may be causing your ATC problems … and which track to pursue to obtain the correct method of repair.
Kenney Skonieczny – President
Kentech Inc.
www.KentechInc.com


